What is Git?
Git is a free and open source distributed version control system designed to handle everything from small to very large projects with speed and efficiency.
Version control is a cornerstone of best programming practices. With Git, you can undo mistakes, track the addition of new features, and most importantly, safely break your website during development.
Git functions as a form of time travel. You can create branches of alternate reality, where you can test new features or save your progress, then decide you'd rather publish the prototype you worked on at 2AM two months ago. It's incredibly powerful for individuals, and allows for limitless collaboration on teams.
Git versus GitHub
Millions of developers and companies build, ship, and maintain their software on GitHub—the largest and most advanced development platform in the world.
GitHub lets you host your code in the cloud, and explore the code of others. Code is stored in 'repositories', which can be public or private. There are other platforms for Git, such as GitLab, but GitHub is the most popular due to its ease of use and community size.
GitHub extends functionality from Git, by adding a visual, web interface. It also lets you create organizations and teams to program collaboratively. A GitHub repository can hold every 'alternate reality' branch created by Git, and let you choose which one to view by selecting it via a drop down menu.
GitHub and GitHub Desktop
Focus on what matters instead of fighting with Git. Whether you're new to Git or a seasoned user, GitHub Desktop simplifies your development workflow.
GitHub Desktop lets you have the functionality of the GitHub website, while more easily accessing your local files. If you don't have an account, go ahead and make one at github.com.
Bonus: GitHub Student Developer Pack
Learn to ship software like a pro. There's no substitute for hands-on experience. But for most students, real world tools can be cost-prohibitive. That's why we created the GitHub Student Developer Pack with some of our partners and friends: to give students free access to the best developer tools in one place so they can learn by doing.
Make sure not to use your @uga.edu email as your primary address. This account will expire when you graduate, and you may lose access to all of your hosted code.
Instead, add or change it to be a secondary email instead, and apply for the Github Student Developer Pack. It's free, usually instantly-approved, and contains thousands of dollars worth of resources. It also upgrades your account to GitHub Pro!
VSCode
Code editing. Redefined.
Free. Built on open source. Runs everywhere.
With Adobe ending support for Brackets on September 21, 2021, NMI students may find it necessary to learn a new platform.
VSCode is a similarly free, open-source, text-editor with a thriving community. It's also the most popular choice for developers, with unparalleled functionality within a lightweight package, and even more features are available through the community marketplace.
Downloads
For this lesson, you'll only need GitHub Desktop and your account, but you may find it useful to download the others to take on the bonus challenges.
Bonus: VSCode Extensions
You certainly don't have to use these, but they're what I've found to be very helpful, general extensions to have.

This extension alternates the colors of matching brackets and parenthesis, making it easier to track nested codeblocks.

See what you're doing, without needing to look away from your code.
Instantly visualize css colors in your css/sass/less/postcss/stylus/XML files and more.

This extension becomes much more applicable if you pursue more theoretical computer science, but is still helpful for web development with its previews of JavaScript and SVG files, among other things.
A good intermediary between quick edits and Git commits - helps keep any tinkering in your working memory for longer.
Prettier is an opinionated code formatter. It enforces a consistent style by parsing your code and re-printing it with its own rules that take the maximum line length into account, wrapping code when necessary.
Access your server and make changes to your website without ever leaving VSCode. Setting up your config file may take some trial and error, but at the end you'll have a streamlined way to SSH in whenever you'd like!
Now to Git to Work...
The intent of this lesson is to introduce you to Git and Github, a Git-based website. This combination is a great way to support teamwork on complex, and often remote, technical projects.
-
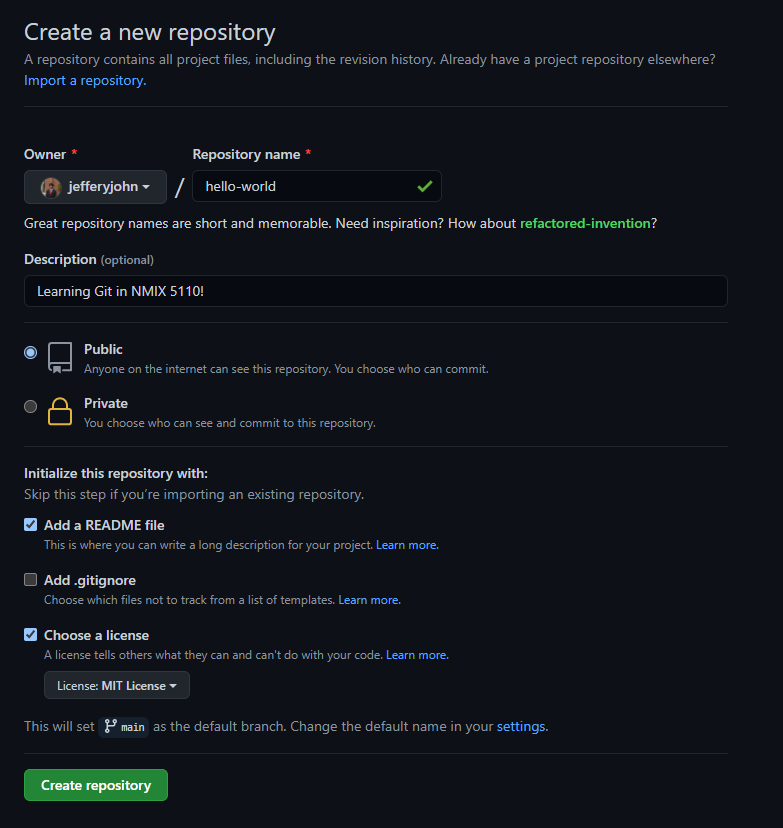
- Create a new repository from the GitHub website

-
- Set the name and description of your repository
- Basic: Leave the repository as public | Advanced: Make the repository private
-
- Making the repository private may add some steps to setting up your development environment, such as adding an SSH key
-
- Initialize the repository with a README file. This will let you be immediately able to clone your repository (since there will be something to clone)
- Choose a license. This is a good practice. If you're interested in reading about Open Source options, look through opensource.guide/legal
-
- For its simplicity, and the fact that this lesson isn't particularly confidential, I'll be choosing the MIT licence.
-
-
- Check that you've installed GitHub Desktop on your computer, if not, find it at: desktop.github.com
- Fire it up. If you have a Github account, login. Otherwise, create one.
GitHub may prompt you to authorize the desktop app, do so. - Go back to the GitHub website and select the option to open your new repository in GitHub Desktop
-

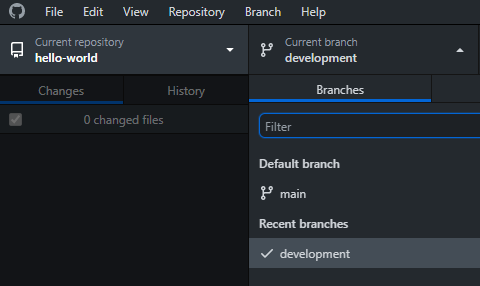
- Take a look at your repository within GitHub Desktop
- Create a new branch - I'll call mine "development"
-
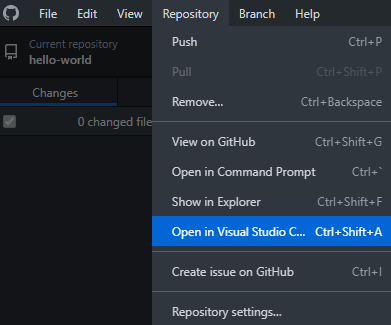
- Using the top navigation menu, select "Repository" and then "Open in Visual Studio Code"
-
- Make whatever changes you'd like. I edited my README file with some information about myself. Make sure to save the file with the changes.
- Open up GitHub Desktop again. Add a commit message for your changes. Short and descriptive is ideal!
-

- On the top menu, select "Current Branch" and then select "main". Select "Choose a branch to merge into main", and choose the new branch you made.
- See how the merge will affect the files of your original repository, then merge!
-
- Alternatively, and closer to what you may do in a corporate environment, publish your new branch, and push your changes there.
- Your supervisor or teammates can collectively decide when and where to incorporate your changes. GitHub's built-in discussion threads are an excellent complement to Git's version control!
-
- Click "Push Origin" to move the changes you made on your computer to the online GitHub repository!
- Visit your repository on the GitHub website to see the changes. If you chose to 'publish' your new branch, you can also see it as an option to view on the branch dropdown menu.

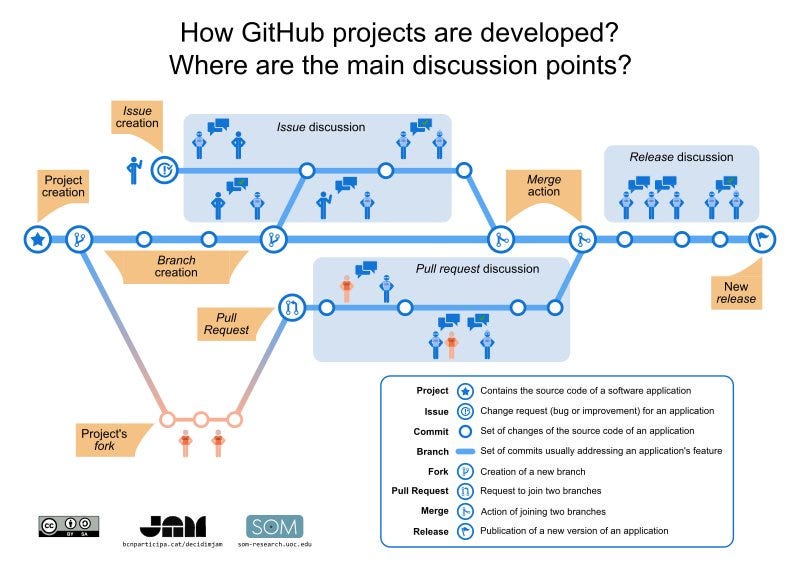
If you'd like, practice by creating even more branches and merging them into each other. On the GitHub website, you can create "pull requests" for branches of other people's code, make your changes, and then ask if they'd be willing to accept your proposed version of their code with a "merge request".
GitHub and the Open Source community have thrived with these features. GitHub's discussion threads are often used to point out issues with certain parts of a project's code, or plan out new features. If you'd like to contribute yourself, some project maintainers highlight "good first issues".
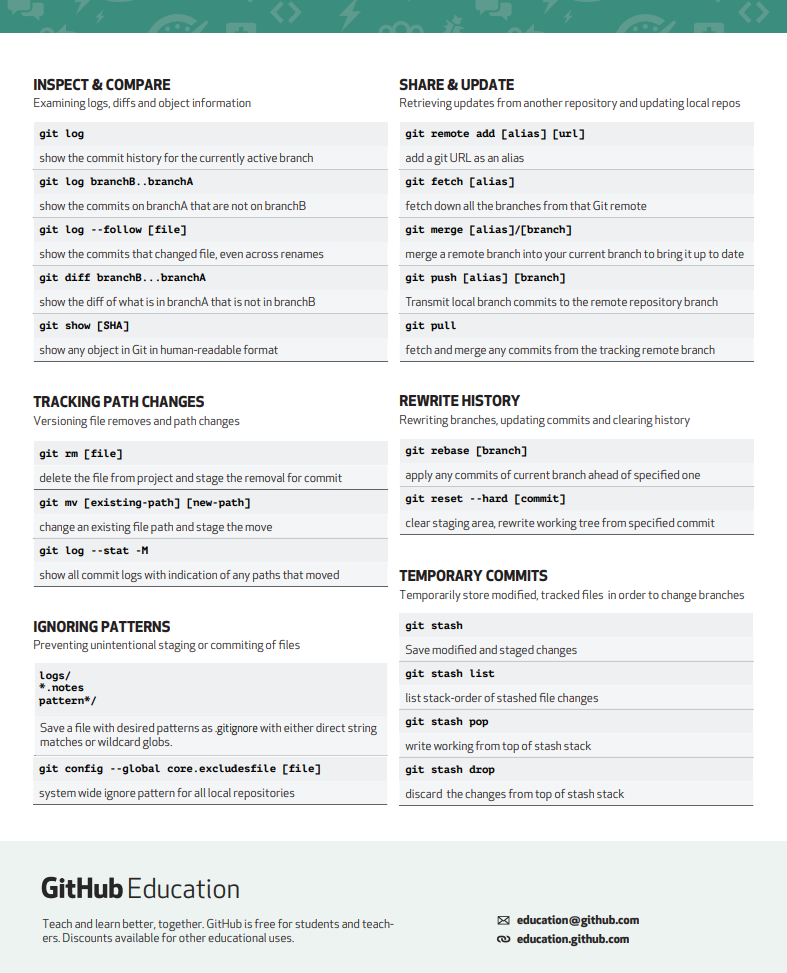
Cheat sheets and Diagrams
A workflow with Git can be a lot to take in! Here are some resources to help you along your way:

Bonus: This Lesson in Terminal
GitHub Desktop and VSCode are great tools, but they may not always be an option. Some clients may not let you download anything onto their machines, or their servers may not be compatible. At some point you might even need to update your website without a mouse!
The command line is extremely useful. If you'd like to practice using a method that will work in any operating environment, here is the list of steps we used in this lesson, but for terminal:
Initial set up:
-
- Open up the integrated terminal in VSCode.
- Make sure you have Git installed on your computer.
- At some point, GitHub may prompt you to authorize your VSCode for access, doing so will help you avoid repeating these steps in the future.
- Set up your username and email: docs.github.com/en/github/getting-started-with-github/set-up-git
- Navigate with the terminal to the folder that you'd like to work in. This can be tricky if you're new to this!
-
- You can use "ls" to show you all the files and folders currently in the directory
- You can use "cd [folder name]" to change your directory to that folder. However, the folder name has to be within the directory you're using "cd" in! Use "ls" to check.
- You can also use "cd .." to move up to a directory one level above where you are currently.
- You can also cd through multiple folders, such as "cd home/classes/nmix5110" to end up in the "nmix5110" folder
- You can use "clear" to, well, clear up your terminal screen.
-
- Once you're ready, move your cursor to be inside your terminal and...
git clone [your repository's url]
ls
cd [your repository's name]
git branch [your new branch name]
git checkout [your new branch name]
[open the repository folder on VSCode]
[Basic: make your changes to the files with VSCode | Advanced: continue with terminal - developers have very strong opinions on which is best, but the three major text editing options are nano/vim/emacs [filename]]
git add . [replace . with a specific file if you'd like]
git commit -m "[your commit message here]"
git checkout main
git merge [your new branch name]
git push
[authenticate w/ GitHub through VSCode if a pop-up appears]
This will pull your repository to the local files of your computer, let you make edits safely on your own branch, move those changes to the main production code with a documented reason, and push everything back to the original GitHub repository. Try using "git log" to see the history of your commits.
Don't be afraid to look online for more commands and ways to navigate your terminal! There's decades of approaches, and everyone will have their own preferences. Here's one more resource for errors you might run into with this lesson: dangitgit.com
Good practice is to only "git add" the files relevant to your next commit, which should be a stable stopping point in your work on the program. For example, if you add a button, you would use "git add [file(s) changed for button]" and then "git commit -m 'Added a button that does x y z'".
If you've only been working on one problem "git add ." adds all files that have been modified to the staging area, ready for your next commit. Otherwise, you can selectively add files, or switch branches for your next update to the team repository. Commits go onto branches, and each branch should aim to only tackle one issue. This way, each member of a team can have their own branch, or problem, and know that their fixes won't overwrite someone else's work.
Bonus: Oh My Git!
Want extra practice? Visit ohmygit.org and play through some levels! The game is free, open-source, and available for Linux, macOS, and Windows. You'll get the hang of programmatic time travel in no time!
Bonus: GitHub Pages
Websites for you and your projects.
Hosted directly from your GitHub repository. Just edit, push, and your changes are live.
GitHub will host your (static) websites for free! If you don't need server-side control, like for storing user information in a database, this can be a great option to show off a project along with the code it's built with. Add a html file to your GitHub repository and see if you can get it live! You can even set it up to use your personal domain name instead of [repository].github.io. Get started here: pages.github.com
Bonus: Useful Repositories to Visit
Bonus: Coding Communities at UGA
You don't have to code alone! There are several resources at the University of Georgia to help you. Along with NMIXperts, there's also the Association for Computing Machinery (ACM) at UGA, ACM-W Girls.Code() at UGA, and UGAHacks!